Transactions
Add, edit, review, match, split, and manage transactions across desktop and mobile.
Written By Pedro
Last updated 5 days ago
Every time money moves, record it as a transaction. Keeping your register current is what keeps your budget accurate.
Adding transactions
Go to the account where the transaction happened.
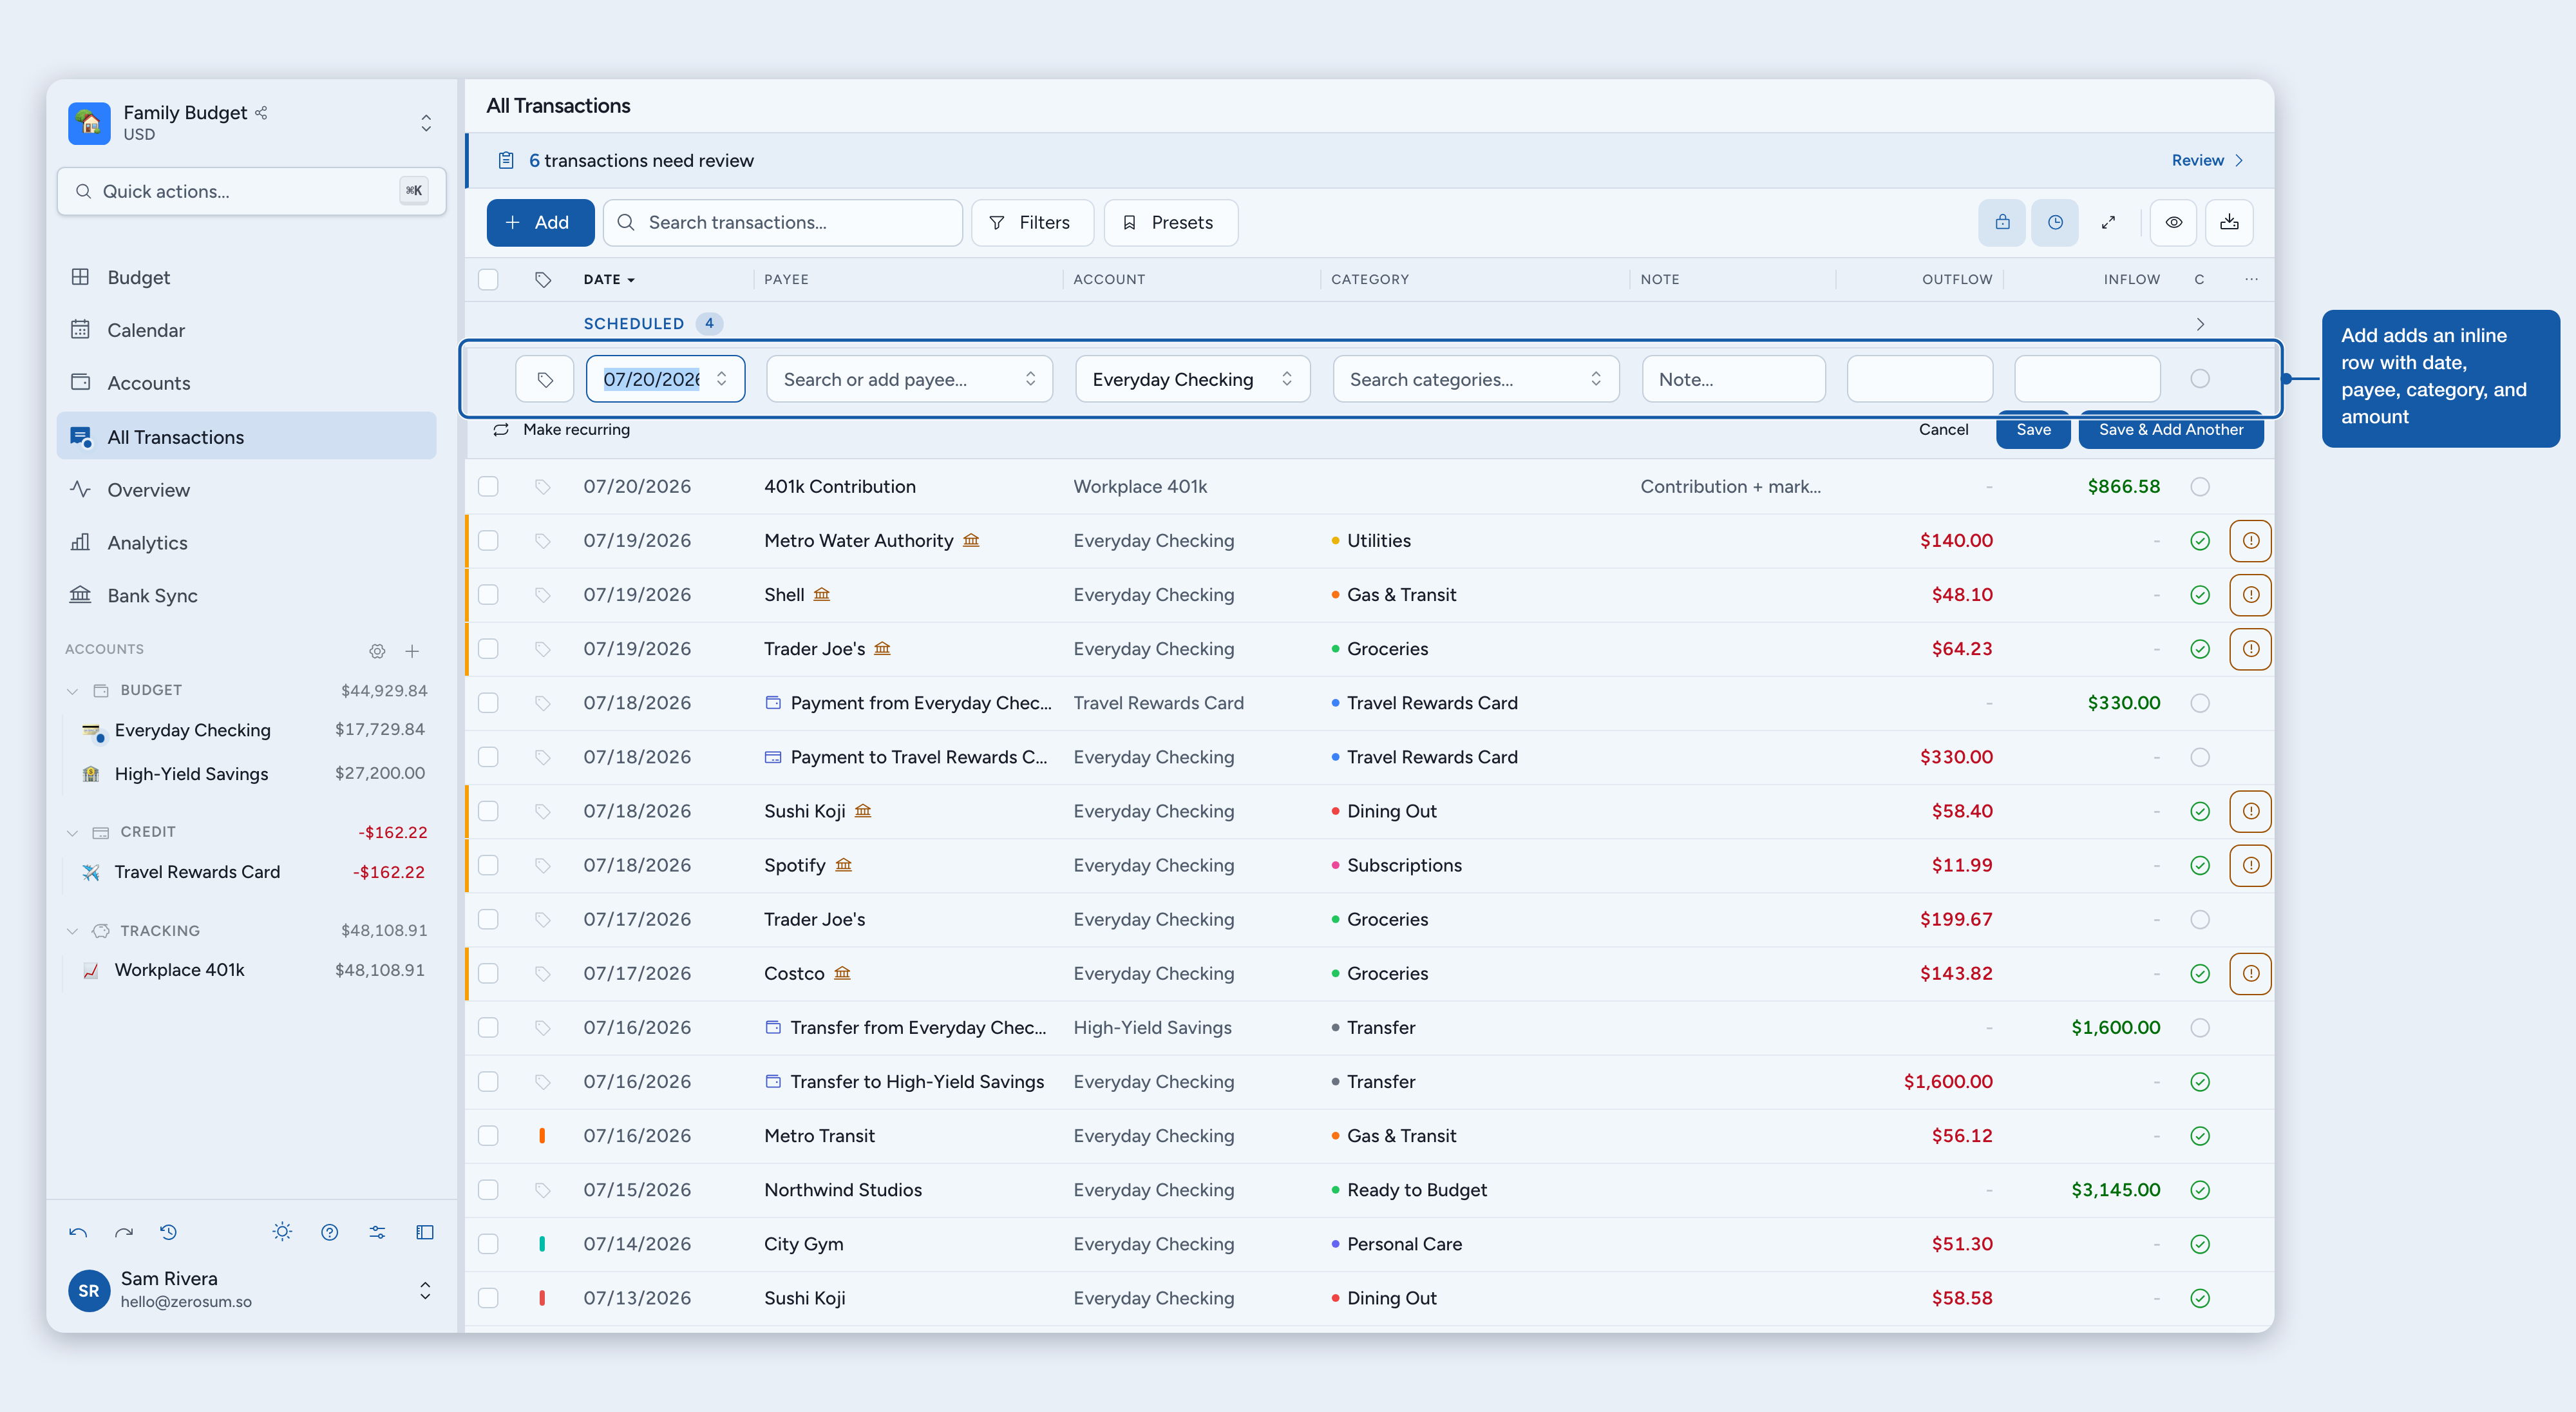
Click Add in the toolbar (shortcut A) on desktop, or tap the floating + Transaction button on your phone. Adding from an account's own page keeps the transaction on that account; picking a payee cannot switch it there.
Enter the date, payee (who you paid), category, and amount. The payee is optional: leave it blank (or pick No payee in the picker) and the transaction shows a gray “No payee” placeholder instead.
Save the transaction.
💡 Tip: Zerosum remembers which categories you use with each payee. Next time you buy from "Walmart," it suggests "Groceries" automatically.
Transaction types
Expense: money going out. Reduces the category's Available balance.
Income: money coming in. Goes straight to Ready to Budget for you to budget.
Transfer: moving money between your own accounts. Most transfers don't affect your budget. Exception: when you transfer from a budget account to a tracking account (e.g. Checking → HYSA), you can set a category like "Savings." That makes the budget side behave like spending on that category, so savings goals fill up and the amount shows in Spending by Category.
Adjustment: a balance correction categorized to Ready to Budget. Zerosum creates one when you change an account's Working balance, explicitly accept a reconciliation difference, or close a non-zero account. An exact reconciliation match does not create an adjustment.
Choosing categories
Every expense needs a category. Ask yourself: "What purpose does this money serve?"
Coffee from Starbucks → "Dining Out" or "Coffee"
Netflix subscription → "Subscriptions" or "Entertainment"
Gas station → "Transportation" or "Gas"
Amazon → whatever you actually bought
ℹ️ Income is different: income doesn't go to a category; it goes to Ready to Budget. You then budget that income to the categories where you need it.
The register shows the category's group before its name, like House: Maintenance, on both desktop and mobile. Same-named categories in different groups stay easy to tell apart. Prefer bare category names? Turn off Category groups in the toolbar's view options; the choice syncs across your devices.
Managing payees
Payees are the people and businesses you transact with. They also power category suggestions and import matching.
Category behavior: use recent categories, a fixed category, or no automatic category.
Import rules: map noisy bank names to the payees you actually use.
Nearby payees: on mobile, optionally suggest the most recent payee used near your current location.
Cleanup: merge duplicates and bank-looking payees into clean names.
💡 Tip: See the full Manage Payees guide for category behavior, nearby payees, exact and contains rules, learned mappings, and cleanup.
Statuses and lifecycle
The C column shows each transaction's status.
Uncleared: the default state. Recorded, but not yet confirmed against your bank.
Cleared: confirmed against your bank. On desktop, click the status icon in the C column to toggle. On your phone, swipe a card right to reveal Clear or Unclear and tap it, keep swiping past halfway to apply it in one motion, or open the actions sheet and tap the status entry at the top. Swiping left reveals Delete. On a transaction in review, the same swipes offer Approve and Reject instead.
Scheduled: future-dated. Appears above the normal register, participates in upcoming funding warnings, and moves into Review when its date arrives.
Recurring: repeats on a rule. Zerosum keeps the next occurrence scheduled and projects later occurrences for monthly planning.
Reconciled: locked after reconciliation, so it can't be changed by accident.
Balances: Working balance equals Cleared balance plus Uncleared balance. Only approved transactions count; in-review imports are excluded until approved. Reconciliation compares the Cleared balance with your bank's posted-only balance. See Understanding account balances.
New transactions you add by hand start uncleared by default. You can set a per-account default in the account's settings (for example, mark a cash account so its transactions start cleared). Scheduled and recurring entries use that same account default while scheduled and when they enter Review. Transfers use the destination account's default for the receiving side. When a bank import links to an entry, the bank's Pending or Posted state supplies the final cleared state.
Reviewing imported transactions
Bank and file imports that need approval appear inline in the normal sorted register with an amber edge. Use Approve or Reject on the row/card, or click the review banner to focus the register on transactions that need attention. In-review rows do not affect your budget until approved.
When an import is linked to an existing entry, Zerosum hides the target and shows one linked review row. Open its link/review icon to compare Previous entry with Bank sent, then Approve, Reject, Edit, or Unlink it. Approve collapses the pair; Reject keeps the previous entry; Unlink (U) shows both originals.
The amber bank icon
The bank icon beside a payee means the raw bank name differs from the payee shown in Zerosum. Hover or focus it on desktop; mobile shows a Bank sent line. It appears on in-review and approved imports, but not when the only difference is case or extra spaces. The raw name stays saved after approval so you can always audit a fuzzy match or import rule.
💡 Full guide: See Reviewing, matching & linking imported transactions for matching windows, field priority, pending-to-posted corrections, Unlink, splits, reconciliation, and examples.
Editing and bulk actions
Click any transaction to edit its date, payee, category, amount, or notes. Changes take effect immediately and your budget updates automatically.
Select multiple transactions using the checkboxes, then use the selection bar or the keyboard shortcuts to act on all of them at once. The selection bar shows the net amount for your selection; on desktop, hover the amount to see the outflow/inflow breakdown.
Payee: change selected transactions to a payee, internal transfer, credit-card payment, or loan payment.
Categorize: set the same category on all selected.
Tag: add or remove tags across the selection (see the Tags guide).
Cleared: mark the selected rows cleared or uncleared.
Add note: add one note to all selected (leave empty to clear).
Move: move all selected to another account.
Duplicate: create copies of the selected transactions.
Enter Now: when every selected row is scheduled or a Pending at bank preview, posts the whole selection today in one step with one undo.
Match (Shift + L): link exactly two eligible rows when one is an unlinked import and both describe the same transaction.
Delete: remove selected approved transactions (transfers delete both sides). When every selected row is still in review, Reject is the removal action and Delete is hidden.
When the selection qualifies (two or more rows with the same payee on the same day), a Convert to split action also appears.
ℹ️ Payee changes use the same rules as transaction entry. Selecting a transfer, credit-card payment, or loan payment creates or updates the matching transfer side and applies any required payment category. Changing a payment back to a regular payee clears managed payment categories so the row can be recategorized. For splits, payee changes apply to the parent; transfer-style payees clear the split lines, and visible split lines are skipped.
💡 Tip: Right-click an approved transaction for the full action menu, or hover to reveal the 3-dot menu. In-review rows instead show their always-visible review/link icon with Approve, Edit, Reject, and—when linked—Unlink. On mobile, tap a linked or structured in-review card for its information sheet; plain in-review cards can be edited directly.
Search and filter
Show uncleared: on your phone, a prompt above the register lists how many transactions are still uncleared. Tapping it filters straight to them.
Search: find by payee, note, amount, category, or tag. Start with a prefix like Category: or Outflow: >= 50 to search one field, and combine several with a comma and a space. See Searching transactions for the full syntax.
Filter: narrow by date range, category, account, payee, tag, cleared status, or direction (inflow or outflow). The date filter starts with one-tap ranges: This month, Last month, Last 3 months, This year, Last year, or All dates. Pick one, or set your own From and To dates; editing either date turns the selection into a fixed range.
Each multi-select filter (categories, accounts, payees, and tags) is a checklist: check the items you want to see, uncheck to hide, then click Done to apply (Cancel discards your changes). Use Select all / Select none to select or clear everything at once; while you search, the buttons become Select, Deselect, or Only the shown results, so bulk actions only touch what is visible. Group headers carry their own checkbox for toggling every shown item in the group. When you uncheck only a few items, the filter flips to exclude mode automatically and reads "Excluding N …" to stay compact.
The Payees filter also lists Transfer: and Payment: entries at the top, one for each of your other accounts, so you can hide (or show only) transfers with a specific account. On the All Transactions view, unchecking one hides both sides of that transfer. On a single account, the list shows your other accounts, since a transfer always moves money to a different account. The list also includes a No payee entry, so you can show only (or hide) transactions saved without a payee. The Direction control is a separate quick filter for inflow only, outflow only, or both.
Save a filter setup as a preset for one-click access later. Presets capture every filter, including which items each one includes or excludes, so you can bookmark views like "all transactions except those in the Chase account." A quick date range is saved as the range itself, not the dates it covered when you saved it: a preset made with This month always shows the current month, whenever you apply it.
💡 Tip: You can also filter by tags: custom colored labels that work alongside categories. Learn more in the Tags guide.
Exporting transactions
Click the Export CSV button in the toolbar (the download icon). A dialog opens showing how many transactions and active filters are included; click Download CSV to save the file. The export respects all active filters and your search (date range, category, account, and more), so you get exactly what you see.
Columns are Date, Account, Payee, Category Group, Category, Memo, Tags, Outflow, Inflow, and Cleared. When the running-balance column is on, a Balance column is included too.
Split transactions
When one purchase covers multiple categories, split it so each part is categorized separately.
Create or edit a transaction with the total amount.
Click Split Transaction in the category dropdown.
Add line items, each with its own category and amount.
Make sure the items add up to the total.
Split transactions show a blue split icon; click it to see the breakdown. To expand every split in the register at once, turn on Expand splits in the toolbar's view options; the setting is remembered across your devices and visits. You can convert any regular transaction into a split, or convert a split back by selecting a single category.
Split lines can each have their own payee. That means one split can mix ordinary category lines with transfers, credit-card payments, and loan payments, while still balancing back to the parent total.
You can also combine existing transactions: select two or more with the same payee on the same day, then choose Convert to split from the selection bar. To reverse it, right-click a split and choose Convert to normal: each line becomes its own transaction again, keeping its category, tags, and note.
If a linked bank correction changes a split's total, the row shows the new bank amount while the existing split lines keep their old amounts. Approve is disabled with Needs a balanced split. Edit the split so its lines add up to the bank total, then approve; or Reject/Unlink to keep the originals.
ℹ️ Important: Each child line can carry its own tags and note. The parent's tag picker is hidden once a transaction is split; tags belong to the children only. This is handy for a Costco run where the groceries, household supplies, and electronics portions each need separate categorization.
💡 Model gross pay with a mixed-sign split: Split lines can mix positive and negative amounts as long as they sum to the total, which lets you mirror a payslip on a single transaction. Record gross pay as a positive line (to Ready to Budget or an income category), then add a negative line for each deduction (taxes, retirement contributions, health premiums) in its own category. The account sees the net, but your reports see the full structure. Income Breakdown and Spending by Category then track the gross figure and deductions show up as categorized spending, so framings like "investing as a percentage of gross income" read straight off a report. Gross income lands in Ready to Budget, so budget the deduction categories to match each payslip; a monthly goal or auto-budget rule on each one keeps this zero-sum. Works for any pay cadence.
Attach receipts
Keep a photo of a receipt or invoice on any transaction. On desktop, click the camera icon in the receipt column (between tags and date) to take or choose a photo. It saves right away, with no editor to open. Rows with a photo show a small thumbnail: hover it for a larger preview, or click to open the photo full size, where you can also Replace or Remove it.
On your phone, tap a transaction and choose Add receipt, or View receipt once one exists, to use the camera or your photo library. The transaction editor also has a Receipt row. Each transaction holds one photo.
Photos are compressed on your device, and location data (EXIF/GPS) is stripped before upload. Images are private to your budget’s members and load through signed links that expire quickly.
If you don’t use receipts, hide the column with the Receipts toggle in the toolbar’s view options, next to Tags. Hiding the column also hides the Receipt field when you add or edit a transaction.
Running balance
Turn on the Show running balance toggle (the scales icon in the toolbar's view options) to add a running-balance column. Each row shows what the account balance was at that point in time. It's available in individual account views, not in "All Accounts."
The view options (running balance, reconciled and scheduled transactions, tags, receipts, and the mobile group-by-day view) are one set of toggles: they apply to All Transactions and every account view alike, and your choices sync across your devices.
The Compact rows toggle, in the toolbar's view options, tightens the transaction list so more rows fit on screen, and shrinks the inputs when you open a row to add or edit. It applies across the all-accounts list, individual account views, scheduled rows, and in-review rows, and the choice syncs across your devices. Mobile keeps its comfortable card layout.
On desktop, drag the divider on a column's right edge to resize it. The neighboring column adjusts to match, so the table keeps its overall width. To restore the defaults, double-click any divider or choose Reset column widths in the toolbar's view options. Widths are saved on this device, separately for All Transactions and single-account views, and don't sync across your devices.
If you turn on forecasts for recurring transactions, the column also includes upcoming repeats that have not been created yet, so the future balance accounts for them.
💡 Tip: Running balance is computed from all transactions, so values stay accurate even when filters are active.
Scheduled and recurring transactions
Future-dated transactions stay in the Scheduled section without affecting balances or budget activity. They still power upcoming category warnings and monthly projections. On their date they move into Review, where you approve or reject them.
Recurring rules keep the next occurrence scheduled and support Enter now, Skip next, weekend behavior, end conditions, early bank matching, splits, transfers, and credit-card routing. Read Scheduled & recurring transactions for the complete lifecycle and worked early-bank example.