Budgets & Categories
Learn how to create and manage budget categories in Zerosum. Organize your spending with category groups and budgets.
Written By Pedro
Last updated About 15 hours ago
This guide covers how they track your money, how to organize and filter them, how to budget, move money, read the status bars in the budget table, and how to customize category colors. You can edit a category or category group to change its assigned color, or turn off colors from your budget under your user settings. Note that these color settings still apply for analytics.
How categories work
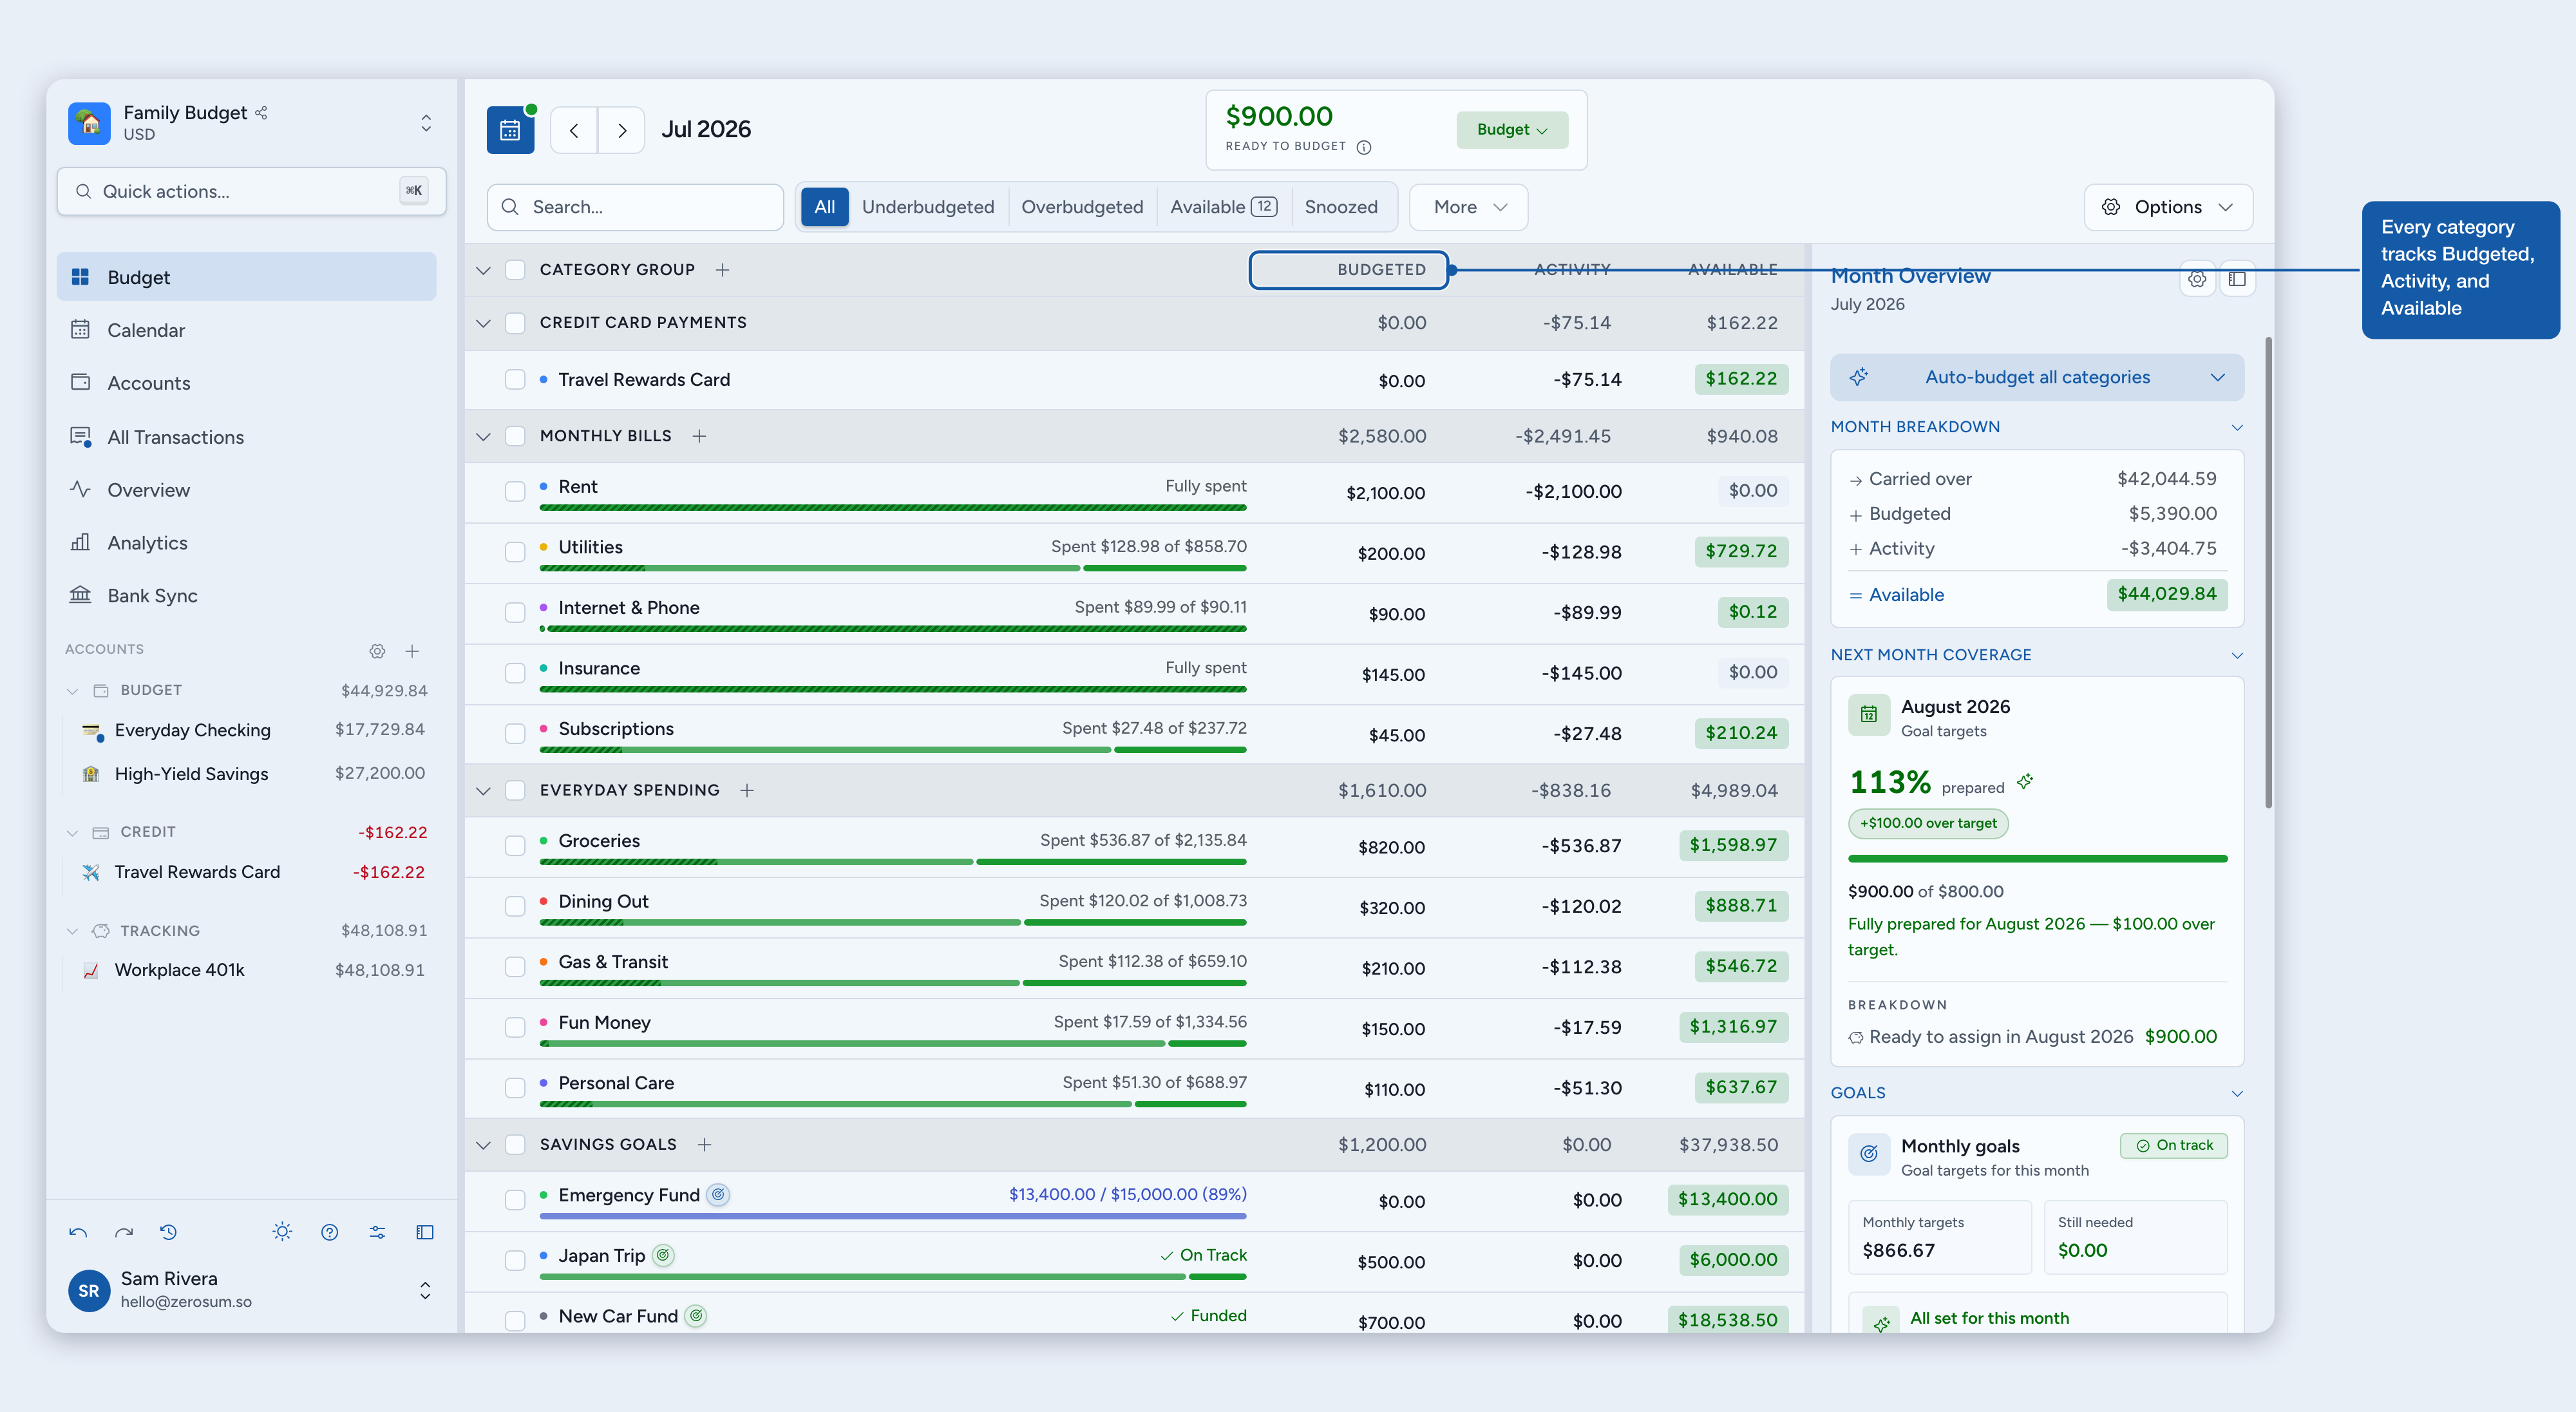
Categories represent purposes for your money: rent, groceries, fun money, savings. Each category tracks three key numbers:
Budgeted: money you've budgeted to this category this month.
Activity: spending (negative) or refunds (positive) this month.
Available: what you can spend right now (carryover + budgeted + activity).
💡 Tip: Focus on Available for spending decisions. It includes any leftover carried over from previous months.
Common category ideas
Fixed expenses: rent/mortgage, utilities, insurance, subscriptions, phone bill.
Variable expenses: groceries, gas, dining out, entertainment, personal care.
Savings: emergency fund, vacation, holidays, car maintenance, home repairs.
Debt: student loans, car payment, medical bills, debt payoff goals.
Row status bars
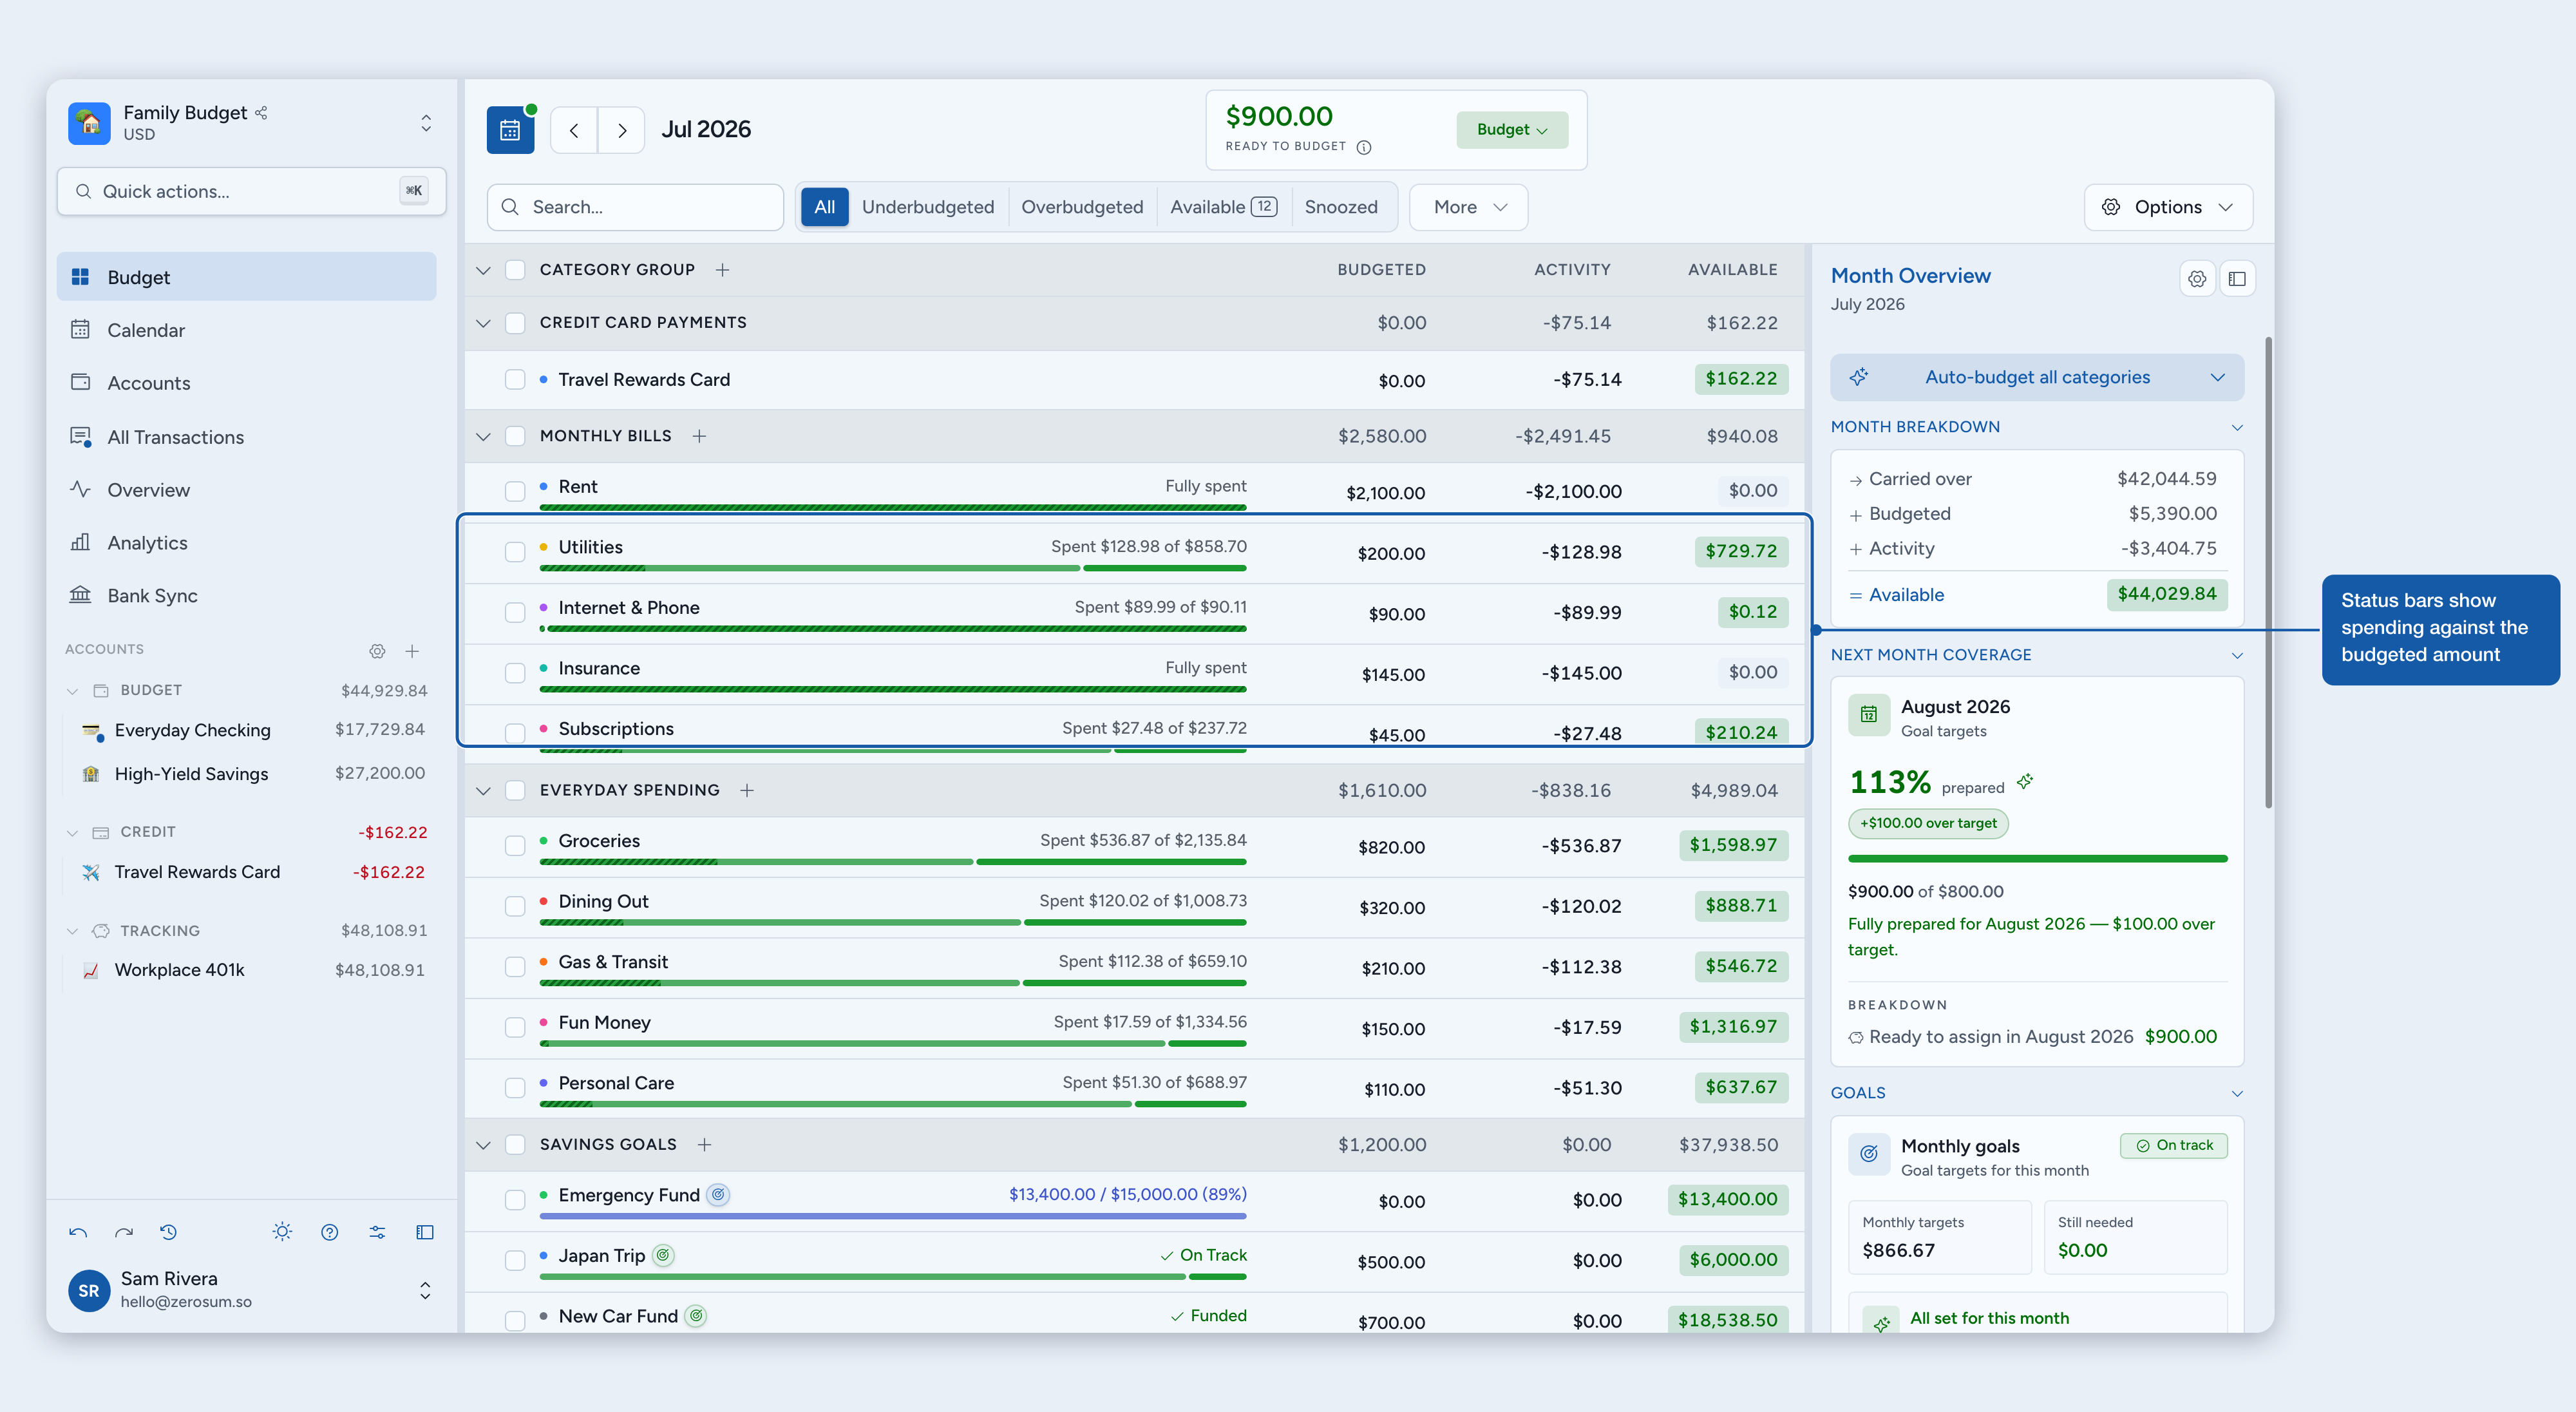
Each category row can show a small progress bar. There are five bar modes, plus two independent toggles, so you can pick what you want to see at a glance:
Combined bar (default), Spending bar, Goal bar, Split bars, or No bar.
Summary text and Compact rows toggles, set separately.
Choose a bar mode in the table Options menu, then toggle Summary text on its own.
💡 Tip: Turn on Compact rows in the same Options menu to tighten the table so more categories fit on screen. The choice syncs across your devices. (Transactions have their own separate Compact toggle in the transactions toolbar.)
Reading a bar
Tick marks under a bar split it into sections; the shape and color tell you the state of each section.
Shapes:
Gray track: the empty bar background, shown wherever a section has no money in it yet.
Solid capsule: funded capacity. Its width matches how much is funded; the rest sits on the gray track. Appears in every mode.
Carryover capsule: money from last month, always the leftmost section, in a lighter shade of the section's color.
Dashed overlay: spending, consuming capacity from the left in the section's status color. The dashed rule is universal: every dashed section is spending.
Red dashed tail: overspending beyond what's available.
Status colors (shared by capsules and dashed overlays alike):
Green: funded or on track.
Yellow: needs money this month or period.
Blue: an open-ended Reach a balance goal's progress.
Red: overspent.
Combined bars with goals
Combined bars reuse the same goal progress that powers goal cards and peeks, reshaped for a budget row. Weekly and biweekly goals (Budget another and Refill up to) show one slot per funding date across the month; on a weekly or biweekly Refill up to goal, leftover money fills the earliest slots first. Monthly, yearly, dated, and open-ended goals show a single pool sized to this month's ask, with carryover counted only once.
If a category has no active goal, or the goal is snoozed for the month, Combined and Split fall back to the spending bar. Goal mode shows no bar for that row, because there's no active goal progress to display.
ℹ️ Need the goal details? The goals article explains how each behavior counts money and why weekly and biweekly goals split into funding dates. See where goals show up.
Personalized category setup
When creating your first budget, enable Help me set up categories to answer a few quick questions and get personalized recommendations:
Housing & transportation: whether you're paying a mortgage, renting, or living with family, and how you get around (car, public transit, bike/walk).
Lifestyle: whether you have pets, how often you dine out, and whether you have subscriptions.
Financial goals: what matters most: emergency fund, vacation, retirement, or major purchases.
💡 Tip: Based on your answers, Zerosum creates categories like Pet Care, Gas, or Dining Out. Essentials like Groceries, Healthcare, and Personal Care are always included. You can skip the questionnaire and customize categories later.
Organizing with Category groups
Category groups let you organize related categories together. They're collapsible, show combined totals, and keep large budgets manageable. For example, a Fixed Expenses group might hold Rent, Utilities, and Insurance, with a running total in the header.
Create a group with the Add category group button: the + in the "Category group" column header (on mobile, the Group button in the toolbar). Rename or delete a group from its right-click menu (Edit group / Delete group); a group can only be deleted once it's empty.
Open the Options menu and choose Manage layout to open a dialog where you can drag categories to reorder them, move them between category groups, and reorder whole category groups.
On desktop, open the Options menu and choose Compare months to view two months side by side (see below).
Collapse groups you don't need to see regularly. The chevron at the top left of the table expands or collapses every group at once, and Cmd/Ctrl + Arrow Down or Cmd/Ctrl + Arrow Up does the same from the keyboard.
Group totals update automatically as you budget.
Filtering the table
The filter bar above the budget table helps you focus on a subset of categories: overspent ones, categories you're saving into, or a custom selection of your own.
Built-in filters
Click a chip on the filter bar to show only matching categories. Click it again (or click All) to clear. The search box narrows by category or group name and combines with any active filter.
Overspent: categories that spent more than they have available.
Underbudgeted: categories that need money now: overspending, goals that aren't on track this month, or upcoming bills the available money won't cover.
Overbudgeted: categories holding more than their goal currently needs: Refill up to goals over their target, and Budget another goals over their Stop at cap. With Plan future months fresh on, that extra shows only once a future month becomes the current month.
Available: categories that still have money to spend.
Snoozed: categories whose goal is snoozed for the current month.
No goal: categories without a goal. Useful when deciding where leftover money should go.
Has goal: categories with a goal, including snoozed goals and goals that start in a future month.
No goal and Has goal start in the More ▾ menu. Pin them from Customize filters if you use them often.
💡 How upcoming bills are counted: Zerosum combines future scheduled rows with projected recurring occurrences for the viewed month. A scheduled-created row keeps its funding warning after it reaches Review, until you approve or reject it; ordinary bank imports never count as scheduled funding. See Scheduled & recurring transactions.
Custom filters
Save your own filter (a curated set of categories or entire groups) and give it a name. Handy for tracking subsets like Fixed bills or Family spending.
Open the More ▾ menu on the filter bar and choose Customize filters…
Click New custom filter.
Name it and check the categories or groups to include. Selecting an entire group is dynamic: categories added to that group later automatically join the filter.
Save. The new filter appears on your bar and activates right away.
ℹ️ Note: Custom filters are shared with everyone on the budget. Your bar layout (which filters are pinned, and in what order) is personal.
Pin, reorder, and hide
Not every built-in is useful to you. Open Customize filters to choose what shows on the bar. Up to eight filters can be pinned; the rest live in the More ▾ menu, still one click away.
Pin / unpin any filter with the pin toggle, built-ins and customs alike.
Reorder within a group by dragging the grip handle on any row. Use the pin toggle to move a filter between Pinned and Available.
Edit or delete a custom filter in place. Deleting removes it for every member of the budget.
Reset pinned filters restores the five built-in defaults without touching any custom filter definitions.
Comparing two months side by side
On desktop, you can view two budget months at once, useful for planning ahead, spotting spending trends, or reconciling differences between months.
Open the Options menu and choose Compare months. The table extends to show a second month-trio of columns (Budgeted / Activity / Available) for the previous month by default.
Each pane has its own month nav and Ready to Budget card, and both months are fully editable. Budgeting to a category in one pane updates carryover in the other.
Use the Link month navigation toggle (the chain icon) to link the two month navs. When linked, advancing or jumping (Today, prev/next) in one pane shifts both, preserving the offset. Use it to scroll through consecutive months, or to compare year-over-year (e.g. March 2024 vs March 2025).
The older month always sits on the left, the newer on the right.
Click the X (Exit compare mode) to leave. Mobile keeps the single-month view; comparing is desktop-only.
Budgeting money to categories
This is where zero-based budgeting happens:
Check your Ready to Budget amount at the top.
Click any category's Budgeted field.
Enter the amount you want to budget and press Enter.
Repeat until Ready to Budget reaches zero: every dollar has a job.
To budget without scrolling, click the Ready to Budget card, pick a category, enter an amount, and click Budget money.
Budgeting tips
Prioritize essentials: budget housing, food, and utilities before entertainment.
Use goals: set up goals to see exactly how much you need each month.
Budget what you have: don't budget money from paychecks that haven't arrived yet.
Defer income to next month: use the For Next Month category to reserve income for the following month.
Moving money between categories
When one category needs more, move money in from another. This is how zero-based budgeting stays flexible.
On desktop, click a category's Available badge to open the move popover. On mobile, tap the category and choose Budget, Move, or Unbudget.
On desktop, set the direction with the From / To toggle: From pulls money into this category from a source, To sends money out to another category.
Pick the other category (or Ready to Budget), then enter the amount.
Confirm with Budget money or Unbudget money when one side is Ready to Budget, or Move money when both sides are categories. Both balances update instantly.
Covering overspending: when a category goes negative, the move popover opens in From mode with the overspent amount pre-filled. The source list shows Ready to Budget plus only the categories that have money available, so you never scroll through empty ones. On mobile, the red overspending banner opens a sheet listing every overspent category; tap one to cover it.
Covering from a future month: while covering, a Cover from selector appears if upcoming months hold budgeted money. Pick a month to see only the categories with money budgeted there, then choose one to pull that money into the current month. A category can give at most what you budgeted in it that month (carryover stays put), and the amount adjusts when the source is smaller. The overspent category itself can be a source, so you can borrow from its own future budget. One undo reverses the whole move.
Funding an underfunded goal: if the category has an underfunded goal, the move tool shows a small goal prompt with the amount needed this month. Use Budget to pre-fill that amount, or budget it immediately when Ready to Budget has enough available.
ℹ️ Note: Moving money never changes your total budget; it only reallocates where dollars are budgeted. You can undo at any time from the sidebar or with the keyboard shortcuts.
Auto-budget options
Open the Auto-budget menu to fill in budget amounts quickly, without editing each category by hand:
Underbudgeted: fund what needs money this month: cover overspending, fund goals, then cover upcoming bills, until Ready to Budget runs out.
Budgeted last month: copy what you budgeted last month into this month.
Spent last month: budget based on last month's actual spending.
Avg spent (6 mo): smooth out variations with a 6-month spending average.
Avg budgeted (6 mo): budget the average of what you budgeted over the last 6 months.
Cover overspending: top up only the categories that overspent.
Reduce overbudgeted: pull back money from categories holding more than they need.
A separate Reset section offers Reset budgeted (clear this month's budgeted amounts) and Reset available (zero out positive Available balances). Reset available first uses the freed money to cover any overspent categories in the same run, then returns the remainder to Ready to Budget. If there isn't enough to cover everything, categories are covered in the order they appear in the table.
How Underbudgeted decides
It works through three needs in order, funding each category to its largest single need and never twice: cover overspending, fund goals, then cover upcoming scheduled bills.
A goal's ask follows its behavior: Budget another wants its amount budgeted for the period, Refill up to wants the gap between the target and what the category already holds, and a dated Reach a balance goal wants this month's slice toward the balance.
For example, a category with a $50 goal and a $50 bill due this month gets $50, because the goal already covers the bill. If the bill were $80, it gets $80 ($50 toward the goal, $30 for the rest of the bill).
Preview before applying
Underbudgeted groups the categories it will fund by reason (overspending, goals, and upcoming bills), each with its own total. Deselect anything to skip it, then apply. If Ready to Budget runs out, the preview shows what was funded and what was skipped.
Auto-budget selected categories only
Select specific categories with their checkboxes, then run auto-budget. It applies only to your selection, and the button shows how many categories are targeted.
How carryover works
Leftover money carries forward automatically. Budget $400 for groceries, spend $350, and $50 shows up next month as starting Available.
Overspending works differently. By default, a negative balance does not carry forward: the category resets to $0 next month, and the overspent amount reduces next month's Ready to Budget.
⚠️ Warning: Cover overspending within the same month by moving money from other categories, to avoid a surprise reduction in next month's Ready to Budget.
If you'd rather the deficit stay on the category, enable Carry over negative balances in Budget settings.
Credit-card-funded overspending is the exception: it is already debt on the card, so it resets from the category either way and never reduces Ready to Budget. See Carry over negative balances.
Adding notes
Add context to your budget with notes, great for remembering why you made certain decisions. Three types are available:
Category notes (permanent): reference info that stays the same across months, like how you calculated a budget amount ("Rent $1,200 + Insurance $200 + Parking $50 = $1,450/mo"). Click the category to find it in the side panel.
Category monthly notes: month-specific annotations for a category ("Budgeted extra for holiday gifts", "Skipped gym while traveling"). Tied to a specific month and shown below the permanent note.
Month overview notes: budget-wide notes for the month ("Got a bonus this month", "Car repair coming up"). Find them in the Notes section of the month overview panel, the side panel's default view (on mobile, tap the Month overview icon).